Moving data between host (CPU) and device (GPU) memories is a crucial part of GPU programming. A very common pattern is to initialize some input data on the host memory, offload the data to the device memory, crunch numbers in parallel using the GPU, and then copy the resulting data back. If you have access to multiple GPUs, potentially across multiple nodes in an HPC system, data movement can get even more complicated. How do data movement and multi-GPU parallelism work in Chapel? We will explore the answer to that question in this article.
Before starting with some code, I recommend taking a look at Daniel Fedorin’s Introduction to GPU Programming in Chapel which covers some basics. The key points from that article that I’ll assume you’re aware of are:
- Chapel’s locales represent parts of the machine that can run code and store variables.
- The
onstatement specifies where code should be executed, including on the GPU.
Refresher: Allocating data
Based on those key points above, let’s review how data can be allocated on device memory in Chapel in more detail here.
|
|
Recall that here.gpus[0] refers to a GPU sublocale that represents the first device
on the node. The body of the on statement targeting that sublocale will cause:
- array data to be allocated on device memory, and
- order-independent operations to run on the device.
Therefore, DevArr is an array whose elements are allocated in device memory.
There’s nothing special about the array’s definition. The array’s elements are
allocated on the GPU because it is defined while executing on a GPU sublocale. If
we look at the full code, you can see that both host- and device-allocated
arrays are declared in the same way:
|
|
Rolling up our sleeves: Moving data between host and device
The example above keeps host and device values where they were declared, and it doesn’t involve any data movement between different memory types. Given that both host- and device-allocated arrays are just Chapel arrays with the same type and features, do you have a guess as to how to copy data between them? For the answer, let’s look at a slightly modified code where the host array is copied into the device array and then copied back after an increment operation:
|
|
Any surprises?
Chapel arrays can be assigned to one another using the assignment operator, =.
The array implementation can figure out where array data is allocated and
will perform bulk copy operations under the hood. In other words, the copies back and
forth in the highlighted lines will each result in a single data movement operation
between the host and the device.
Getting serious: Move parts of an array between host and device
More often than not, you’ll want to move only parts of the data to the device, operate on that part, copy the output from that part back to the host, and repeat until you finish processing your data in full. There could be multiple reasons for doing this:
- Your input data might be too large for your device memory.
- You might want to distribute the data onto multiple GPUs if your system has more than one.
- You can overlap data transfer with computation to hide the latency of such transfers.
Let’s expand on our previous example and make it closer to a case where you have a very large input array:
|
|
config const looks cool, what is that?
config is a unique and very powerful concept in Chapel and has nothing to do
with GPU support. Variables at module scope can be declared with the config
qualifier to turn them into compile- or execution-time arguments. For example,
with the source above, the application can be run using ./slices --n=2_000_000 --sliceSize=1000 to set n to 2,000,000 and the slice size to 1000. You can read more about config in the Chapel Users
Guide.
There are two key changes from the previous example. First, we use the
RangeChunk
module to slice the range 1..n up into numSlices chunks, which are also of
type range. The chunks iterator makes sure that the generated chunks cover
the whole range, even if n is not divisible by numSlices.
More importantly, the loop body now copies array slices back and forth. Chapel
arrays can be indexed with the [] syntax. However, that syntax can also be
used to slice arrays. For example, if the argument to the operator is a range,
then an array slice will be created. An array slice does not have its own data;
it uses the same data as the original array.
You may have guessed it already, but an array slice can be used pretty much anywhere an array can be used. If
they are used in assignments like the ones in the highlighted lines, the
corresponding data will be copied in bulk. The fact that one or both sides of an
array assignment is an array slice whose data is stored on a GPU does not matter —
Chapel will copy the relevant data between the host and the device under the
hood.
Getting efficient: Overlapping data transfer with computation
Currently, the GPU sublocale copies a slice of HostArr into the device memory
first. Once the copy is complete, the kernel executes. And then, once the
kernel finishes, the data is copied back. Only then does the program move on to
copying the next slice. This sequential execution of copy-execute-copy leaves
some performance on the table. GPUs are capable of transferring data while
executing a kernel. Some higher-end GPUs can even handle multiple
data copies in each direction (host-to-device, device-to-host) while
executing a kernel.
Overlapping data movement and processing is a common optimization. In a typical overlapping scenario, a single device is used by multiple parallel execution units. Some of these parallel units can perform data transfers while another executes a kernel. Let’s take a look at how we can achieve this with Chapel’s features for parallelism:
|
|
The key difference from the previous example is highlighted. Here, we are using
a coforall loop instead of a for loop. A coforall loop creates a parallel
task per iteration. These tasks can run concurrently.
Chapel tasks running on the same GPU sublocale can execute GPU operations — including transfers and kernel launch — independently of one another. Depending on the capabilities of your particular hardware and available resources, the underlying GPU can overlap data transfer and execution from distinct tasks, leading to [note: Admittedly, overlap is an optimization which can be a hard to fine-tune; the balance between transfer performance (bandwidth and latency) and computational intensity should be handled delicately. Furthermore, fine-tuning overlap is typically specific to the hardware and application characteristics. For example, in our very simple case of launching a kernel to increment each element of the array by one, I don't expect any gain from overlap. This application has almost no computation, and the execution time will be dominated by data transfer, diminishing any chance to overlap. However, for more realistic and computationally intensive applications, the benefits can be significant. We plan to revisit overlap with a more realistic example in a future article. ].
Tell me more about how this works before we move on
GPUs can perform transfer and execution asynchronously from the CPU. This is achieved by a concept called a stream or work queue. The CPU can create multiple streams per GPU, and queue up operations in those streams. The GPU driver guarantees that the order of operations within a stream will be preserved. However, it can schedule operations from different streams in any order it sees fit. Typically, this is driven by the availability of data transfer and/or execution units at the time of scheduling.
Chapel tasks create and use their own streams when interacting with GPUs. This enables operations coming from distinct tasks to be scheduled concurrently for potential overlap.
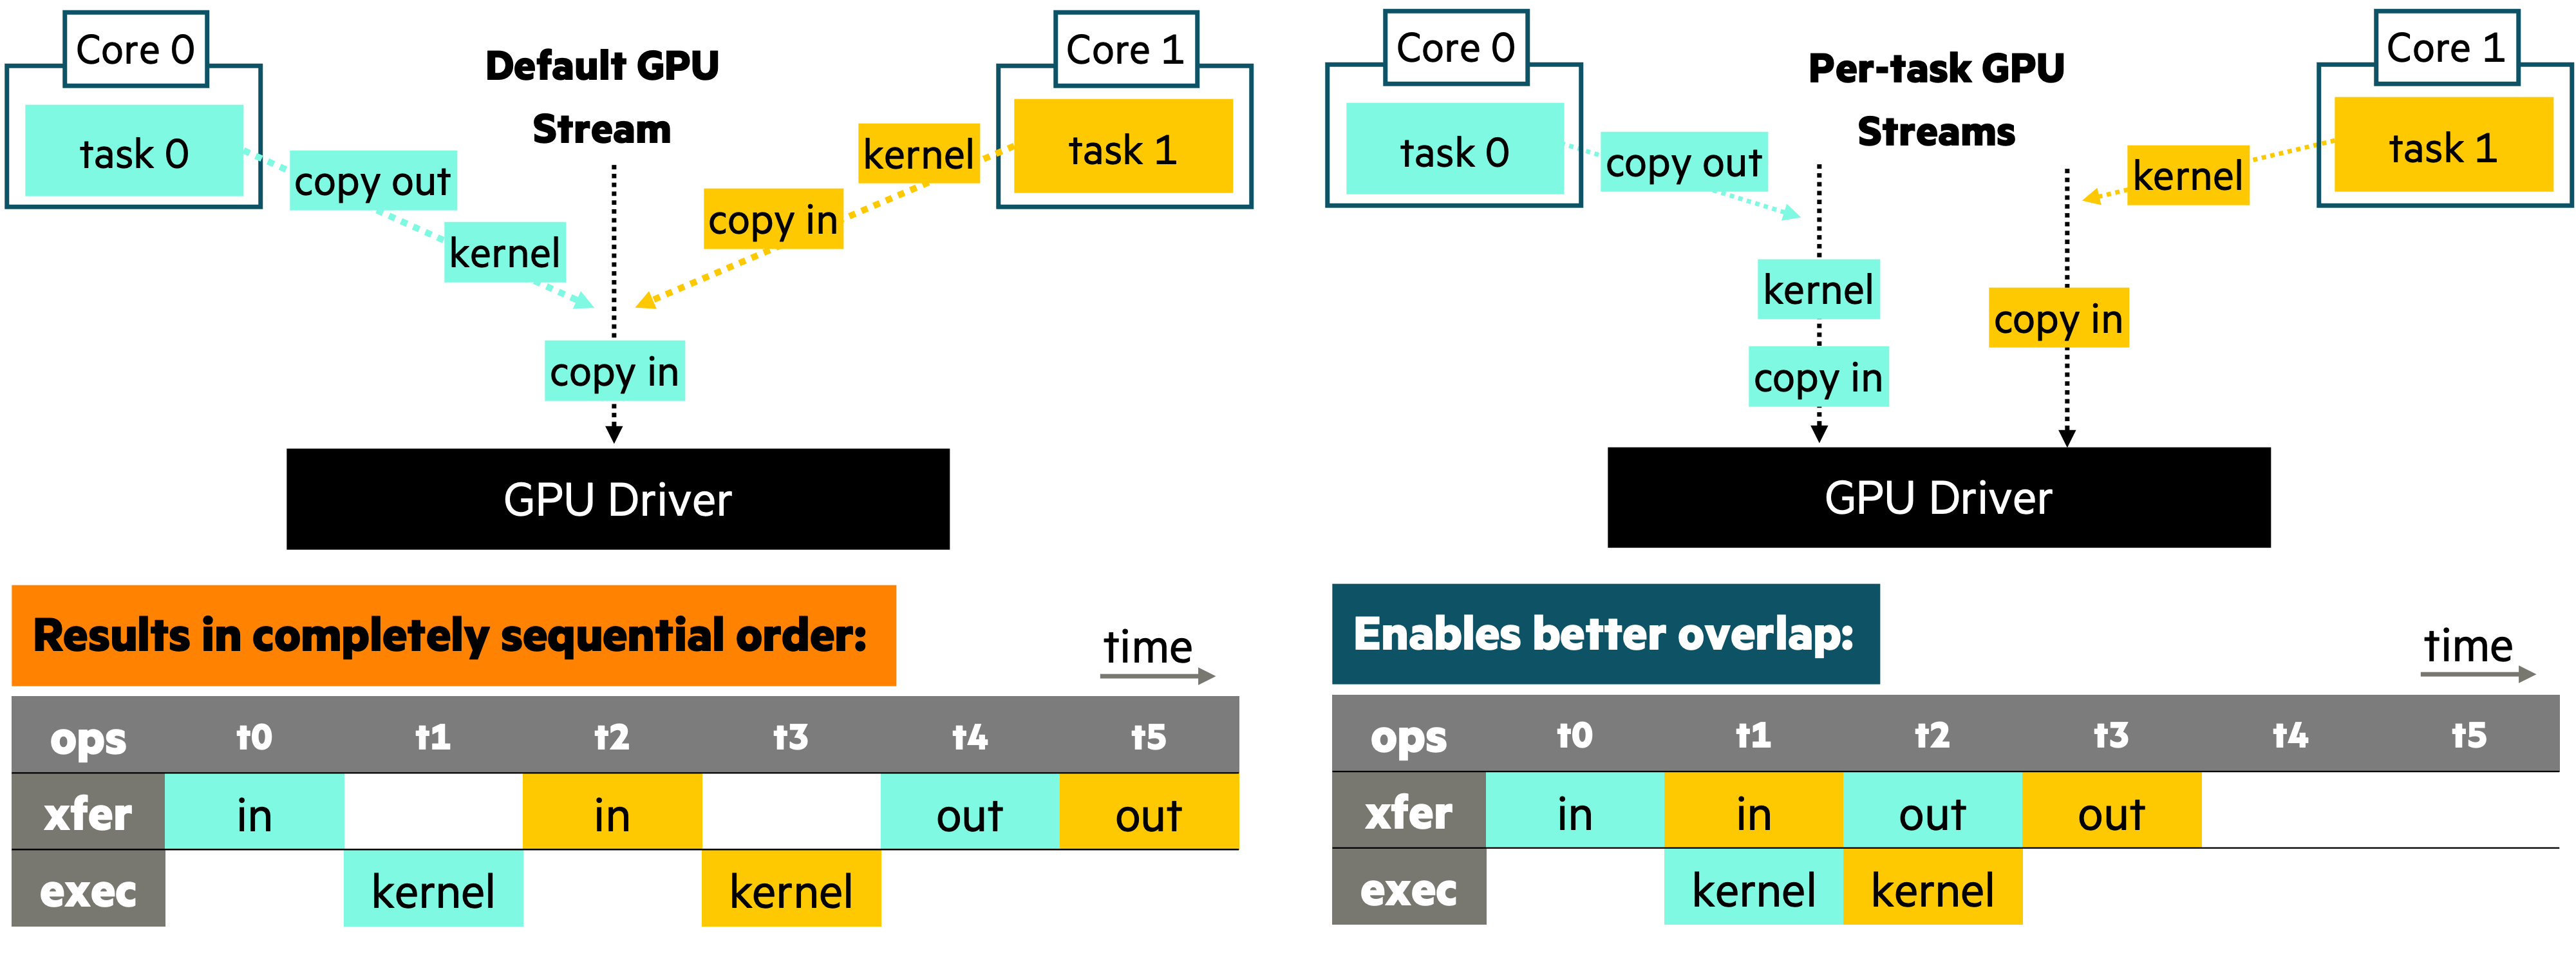
Using per-task streams can enable overlap
The figure above shows the difference between using the default stream and per-task GPU streams in the context of two tasks and a toy workload, where the scheduling permitted by the per-task streams results in faster execution.
Getting parallel: Use multiple GPUs concurrently
One of the cases where you might want to copy slices of arrays back and forth is
when you have multiple GPUs in your workstation/server or you have access to a cluster
or a supercomputer with multiple GPUs per node. Luckily, we have already seen a
way of executing a number of parallel tasks concurrently. Yes, I am talking
about coforall loops:
|
|
In this code, we introduce a second coforall loop, which we use to compute
with multiple GPUs simultaneously. This loop uses zip, which causes it to
iterate over the GPUs in the current node and the chunks generated by the
chunks iterator in a lock-step manner. Here, we are iterating over the GPUs in
the current node, and the chunks generated by the chunks iterator as we have
seen before.
In the end, gpu and gpuChunk represent a GPU
sublocale and the chunk that it needs to work on for each
task created by the coforall loop. Then, an on statement moves each task
onto its corresponding GPU sublocale.
Using a coforall loop together with an on statement to use multiple GPU
sublocales concurrently is nothing new in Chapel. In fact, coforall loops are
commonly used with on statements to parallelize work across multiple compute nodes. In the next
step, we will re-use the idiom introduced here to expand the execution to
multiple nodes.
Getting distributed: Use multiple nodes with multiple GPUs concurrently
We can expand our previous example to use multiple nodes by adding another
similar coforall loop and an on statement:
|
|
The highlighted idiom should be familiar. Instead of iterating over here.gpus
as in Line 12, we are iterating over Locales. Locales is a built-in array
that represents all compute nodes the application is using. Similarly,
numLocales is another built-in that’s just a slightly more convenient way of
doing Locales.size. Finally, the on statement here targets a locale that
represents a compute node.
Overall, this snippet uses the same idiom to distribute work across compute nodes and across GPUs within them.
Summary
We’ve covered a lot of ground in this post:
-
We’ve observed that Chapel’s high-level array operations—like assignment and slicing—can be used to move data between GPUs and CPUs.
-
We’ve explored how Chapel’s parallelism and locality features can enable using multiple GPUs and/or multiple GPUs on multiple compute nodes, whether you’re on your laptop, GPU-based server, or a supercomputer.
If you were already familiar with Chapel, the key takeaway is that there aren’t a lot of new concepts to learn that enable GPU programming — the features that you know about can readily enable GPU programming. If you are new to Chapel but know about GPU programming, the key takeaway is that Chapel makes programming GPUs feel as natural as programming CPUs. If you are new to both Chapel and GPU programming, the key takeaway is that GPU programming doesn’t have to be scary!
So far, we have only covered how to program GPUs in Chapel. None of it matters unless it performs and scales well. Stay tuned for our upcoming GPU blog posts about performance and scaling!