chplcheck
chplcheck is a linter for the Chapel programming language implemented in
Python using the Python bindings for the compiler frontend.
It is intended to catch stylistic mistakes and bad practices in Chapel programs.
It is also intended to be customizable and extensible, using a system of named
‘rules’ that lead to warnings.
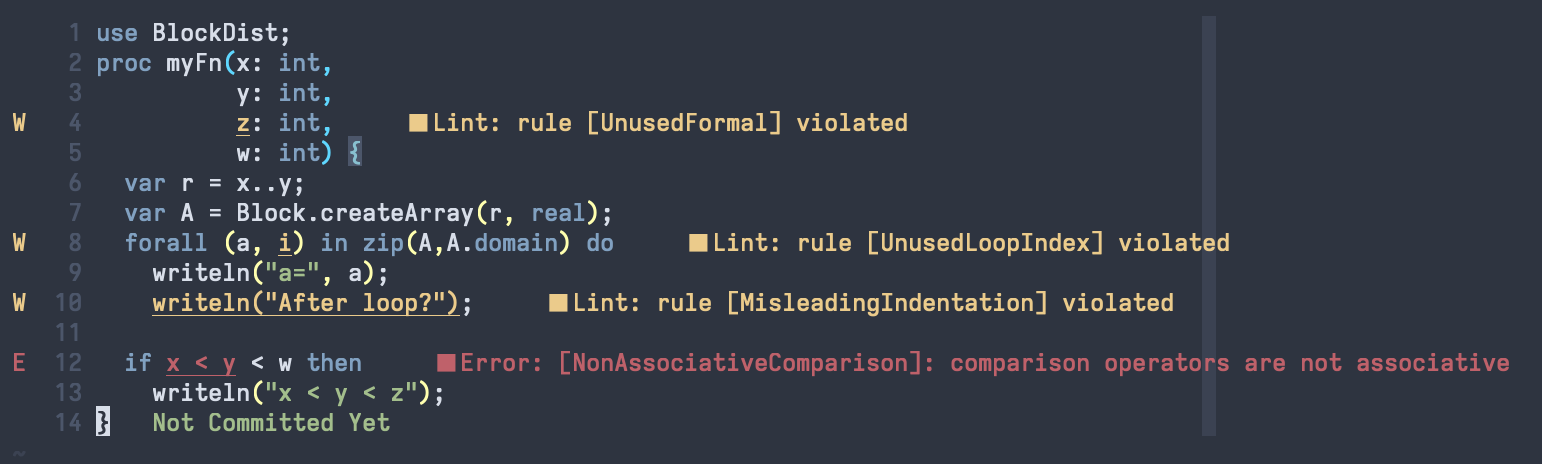
chplcheck supports the Language Server Protocol, allowing it to be used as
part of your favorite editor. The following image demonstrates its use in
Neovim:
Getting Started
The easiest way to make chplcheck available on your command line is by using the
chplcheck Makefile target. This will build the Dyno compiler frontend and the
Python bindings for Dyno if needed, and place chplcheck into $CHPL_HOME/bin.
Make sure that you satisfy the requirements for building the Python bindings.
cd $CHPL_HOME
make chplcheck
chplcheck --help
Saving the following file into myfile.chpl:
1record MyRecord {}
2
3for i in 1..10 do {
4  writeln("Hello, world!");
5}
The linter is run as follows:
> chplcheck myfile.chpl
path/to/myfile/myfile.chpl:1: node violates rule CamelCaseRecords
path/to/myfile/myfile.chpl:3: node violates rule DoKeywordAndBlock
path/to/myfile/myfile.chpl:3: node violates rule UnusedLoopIndex
Enabling / Disabling Rules
Each rule, such as CamelCaseRecords, can be individually enabled or
disabled from the command line using --enable-rule and --disable-rule.
To silence the warning about unused loop indices such as i in the above
code, we can invoke chplcheck as follows:
> chplcheck myfile.chpl --disable-rule UnusedLoopIndex
path/to/myfile/myfile.chpl:1: node violates rule CamelCaseRecords
path/to/myfile/myfile.chpl:3: node violates rule DoKeywordAndBlock
Some rules are disabled by default. One such rule is UseExplicitModules, which
warns against letting Chapel automatically create the top-level module in a file.
> chplcheck myfile.chpl --enable-rule UseExplicitModules
path/to/myfile/myfile.chpl:1: node violates rule CamelCaseRecords
path/to/myfile/myfile.chpl:1: node violates rule UseExplicitModules
path/to/myfile/myfile.chpl:3: node violates rule DoKeywordAndBlock
path/to/myfile/myfile.chpl:3: node violates rule UnusedLoopIndex
To get a list of all available rules, use the --list-rules flag. To see
which rules are currently enabled, use the --list-active-rules flag. If you
have loaded custom rules, these will be included
in the output.
> chplcheck --list-rules
...
> chplcheck --list-active-rules
...
Rules can also be ignored on a case-by-case basis by adding a
@chplcheck.ignore attribute with a string argument stating the rule to
ignore. For example:
@chplcheck.ignore("CamelCaseRecords")
record MyRecord {}
This will suppress the warning about MyRecord not being in camelCase.
Note
chplcheck.ignore is a Chapel attribute and is subject to the same
limitations as other attributes in the language. This means that it cannot be used to ignore all warnings; for
example it currently cannot be used on an if statement.
Note
There is currently no way to ignore more than one rule at at time for a
given statement. Adding multiple chplcheck.ignore annotations will
result in a compilation error.
Fixits
Some rules have fixits associated with them. Fixits are suggestions for how to
resolve a given issue, either by editing the code or by adding
@chplcheck.ignore. If using chplcheck as a command line tool, you can
apply these fixits by using the --fixit flag. When using chplcheck from
an editor, the editor may provide a way to apply fixits directly with a Quick
Fix.
When using the command line, a few additional flags are available to control how fixits are applied:
--fixit: Apply fixits to the file. By default, this is done in-place, overwriting the original file with the fixed version.--fixit-suffix <suffix>: Apply fixits to a new file with the given suffix appended to the original file name. For example,--fixit-suffix .fixedwould create a new file namedmyfile.chpl.fixedwith the fixits applied.--interactive: Starts an interactive session where you can choose which fixits to apply.
Setting Up In Your Editor
chplcheck uses the Language Server Protocol (LSP) to integrate with compatible
clients. If your editor supports LSP, you can configure it to display
linting warnings via chplcheck. See the
Editor Support page for details on a specific
editor.
Writing New Rules
Rules are written using the Python bindings for Chapel’s compiler frontend. In
essence, a rule is a Python function that is used to detect issues with the
AST. When registered with chplcheck, the name of the function becomes the name
of the rule (which can be used to enable and disable the rule, as per the
above sections). To mark a Python function as representing a rule,
chplcheck’s Python API provides two decorators. These decorators correspond
to the two ‘flavors’ of rules in the linter: ‘basic’ and ‘advanced’.
Basic Rules
Basic rules are specified using a pattern.
This pattern represents which AST nodes should be scrutinized to check if something.
The driver.basic_rule decorator is used to specify such rules. For instance,
the following basic rule checks that explicit modules have PascalCase naming:
@driver.basic_rule(Module)
def PascalCaseModules(context, node):
    return node.kind() == "implicit" or check_pascal_case(node)
The Module argument to basic_rule specifies that the linter should call
the PascalCaseModules function with each Module node it encounters. If
the function returns True, no warning should be emitted. If the function
returns False, the linter should produce a warning. The conditional returns
True for all implicit modules, regardless of their name: this is because
implicit modules are named after the file they are in, so the user cannot “fix”
the code by editing it. For explicit modules, a helper function
check_pascal_case is used to ensure that the node’s name is appropriately
cased.
Patterns can be more advanced than simply specifying an AST node type. The
following rule makes more use of patterns by specifying that it should be
applied only to if-statements that just have a boolean literal as their
condition.
@driver.basic_rule([Conditional, BoolLiteral, chapel.rest])
def BoolLitInCondStmt(context, node):
    return False
Advanced Rules
Sometimes, specifying a pattern is not precise enough to implement a rule. For
example, a linting check might require considering two sibling nodes or other
less-straightforward relationships than “does it match the pattern?”. This is
the purpose of advanced rules. These functions are called with the root AST
node (usually a top-level Module). Then, it is the responsibility
of the function to find and yield AST nodes that should be warned about.
For instance, at the time of writing, the following code implements the rule
checking for unused formals.
@driver.advanced_rule
def UnusedFormal(context, root):
    formals = dict()
    uses = set()

    for (formal, _) in chapel.each_matching(root, Formal):
        # For now, it's harder to tell if we're ignoring 'this' formals
        # (what about method calls with implicit receiver?). So skip
        # 'this' formals.
        if formal.name() == "this":
            continue

        # extern functions have no bodies that can use their formals.
        if formal.parent().linkage() == "extern":
            continue

        formals[formal.unique_id()] = formal

    for (use, _) in chapel.each_matching(root, Identifier):
        refersto = use.to_node()
        if refersto:
            uses.add(refersto.unique_id())

    for unused in formals.keys() - uses:
        yield formals[unused]
This function performs _two_ pattern-based searches: one for formals, and one for identifiers that might reference the formals. It then emits a warning for each formal for which there wasn’t a corresponding identifier.
Making Rules Ignorable
The linter has a mechanism for marking a rule as supporting the @chplcheck.ignore attribute. When rules are marked as such, the linter will automatically
provide a fixit to apply the attribute.
Ignorable basic rules should return BasicRuleResult with ignorable set
to True rather than just a boolean. The BasicRuleResult constructor
takes a AstNode as an argument, which is the node that the rule is being
applied to. For example, the following defines a basic rule that is ignorable:
@driver.basic_rule(chapel.Function)
def NoFunctionFoo(context, node):
    if node.name() == "foo":
        return BasicRuleResult(node, ignorable=True)
    return True
Ignorable advanced rules should yield a AdvancedRuleResult with anchor
set rather than just a AstNode. The AdvancedRuleResult constructor
takes an AstNode as an argument, which is the node that the rule is being
applied to. The anchor is the node should have a @chplcheck.ignore
annotation to suppress the warning. anchor and node can be the same
node. For example, the following defines an advanced rule that is ignorable:
@driver.advanced_rule
def NoLoopIndexI(context, root):
    for loop, _ in chapel.each_matching(root, IndexableLoop):
        idx = loop.index()
        if idx.name() == "i":
            yield AdvancedRuleResult(idx, anchor=loop)
Since loop indices can’t have attributes applied to them directly, the rule above uses the parent loop as an anchor. Applying the attribute to the loop will silence the warning on the index.
Fixits
Rules can have fixits associated with them, which allow chplcheck to
automatically resolve issues it encounters. To define a fixit, the rule should
construct a Fixit object and associate it with its result
(BasicRuleResult or AdvancedRuleResult for basic and advanced rules,
respectively). This can be done in two ways (see below).
A Fixit contains a list of Edit objects to apply to the code and an
optional description, which is shown to the user when the fixit is applied.
Edit objects contain a file path, a range defined by start and end
positions, and the text to replace inside of that range. The recommend way to
create an Edit object is to use the Edit.build class method, which
takes a chapel.Location and the text to replace it with.
For example, the following defines a rule that has a fixit associated with it:
@driver.basic_rule(chapel.Function)
def NoFunctionFoo(context, node):
    if node.name() == "foo":
        fixit = Fixit.build(Edit.build(node.name_location(), "bar"))
        fixit.description = "Replace 'foo' with 'bar'"
        return BasicRuleResult(node, fixits=[fixit])
    return True
Note
The fixit for ‘NoFunctionFoo’ demonstrated here is not production-ready. It does not rename the uses of the function, nor does it check for conflicts with other names in the file. It is intended only to demonstrate the API for defining fixits. The same is true for various other versions of this example in this section.
The above code snippet directly uses a fixits= argument to the
BasicRuleResult constructor. This is one of two ways to associate fixits with
rules. Both advanced and basic rule results support this constructor argument.
Constructing the Edit objects can become relatively complicated for more
powerful auto-fixes. In practice, chplcheck developers have observed
that the code to construct the necessary edits can be longer than the code
implementing the rule. To provide a separation of concerns between
“what should be warned about” and “how to fix the warning”, chplcheck
provides a second mechanism to attach fixits to rules: the @driver.fixit
decorator.
This decorator accepts the rule-to-be-fixed as an argument, and wraps a function
that accepts the result of the rule. The wrapped function should use
the information returned by the rule to construct a Fixit object or a list of
Fixit objects.
For example, the snippet above can be written using the decorator as follows:
@driver.basic_rule(chapel.Function)
def NoFunctionFoo(context, node):
    return node.name() != "foo"

@driver.fixit(NoFunctionFoo)
def FixNoFunctionFoo(context, result: BasicRuleResult):
    fixit = Fixit.build(Edit.build(result.node.name_location(), "bar"))
    fixit.description = "Replace 'foo' with 'bar'"
    return fixit
Multiple fixits can be attached to a rule by using the @driver.fixit decorator
several times.
Particularly complicated rules can do a number of AST traversals and computations
to determine whether a warning should be emitted. The information gathered
in the process of these computations may be required to issue a fixit. When
using the @driver.fixit decorator, it appears as though this information
is lost. To address this, both BasicRuleResult and AdvancedRuleResult
accept an additional data argument. This argument can be of any type.
When decorator-based fixit functions are invoked, this data can be accessed
as a field on the result object.
@driver.basic_rule(chapel.Function)
def NoFunctionFoo(context, node):
    if node.name() == "foo":
        return BasicRuleResult(node, data="some data")
    return

@driver.fixit(NoFunctionFoo)
def FixNoFunctionFoo(context, result: BasicRuleResult):
    print(result.data)  # prints "some data"
    fixit = Fixit.build(Edit.build(result.node.name_location(), "bar"))
    fixit.description = "Replace 'foo' with 'bar'"
    return fixit
Note
The API for defining fixits is still under development and may change in the future.
Adding Custom Rules
Developers may have their own preferences for their code they would like to be
enforced by a linter. Rather than adding their own rule to rules.py,
developers can load a custom rule file that contains all of their custom rules.
For example, the following code is a complete definition of two new rules for
chplcheck. Note that the top-level function must be named rules and take
one argument.
# saved in file `myrules.py`
import chapel

def rules(driver):

  @driver.basic_rule(chapel.Function)
  def NoFunctionFoo(context, node):
    return node.name() != "foo"

  @driver.basic_rule(chapel.Variable, default=False)
  def NoVariableBar(context, node):
    return node.name() != "bar"
To use these rules with chplcheck, use the --add-rules command line
argument.
Saving the following file into myfile.chpl:
1proc foo() {
2  var bar = 10;
3}
The linter is run as follows:
> chplcheck myfile.chpl --add-rules path/to/my/myrules.py --enable-rule NoVariableBar
path/to/myfile/myfile.chpl:1: node violates rule NoFunctionFoo
path/to/myfile/myfile.chpl:2: node violates rule NoVariableBar