Chapel Quickstart Instructions
These instructions are designed to help users get started with a single-locale (shared-memory) implementation of Chapel as quickly as possible. If you want to understand Chapel’s configuration options, build process, and installation more thoroughly, please refer to Setting up Your Environment for Chapel and Building Chapel instead.
The options for getting started, in order of preference, are:
Binary Release via a Package Manager
Chapel provides binary releases for several platforms and operating systems. If you are using a platform for which Chapel provides a binary release, we recommend using it to get the easiest and fastest start with Chapel. To install Chapel this way, download the appropriate package for your OS and platform and install it using your system’s package manager.
For example, on Ubuntu 24 with x86_64, you can use the following to install Chapel 2.4:
wget https://github.com/chapel-lang/chapel/releases/download/2.4.0/chapel-2.4.0-1.ubuntu24.amd64.deb
sudo apt-get update
sudo agt-get install ./chapel-2.4.0-1.ubuntu24.amd64.deb
For example, on Fedora 41 with aarch64, you can use the following to install Chapel 2.4:
wget https://github.com/chapel-lang/chapel/releases/download/2.4.0/chapel-2.4.0-1.fc41.aarch64.rpm
sudo dnf update
sudo dnf install ./chapel-2.4.0-1.fc41.aarch64.rpm
See this page for the most up-to-date list of supported OSes and platforms.
brew
If you are using brew, you can also install Chapel
directly with brew install chapel. This will install the latest Chapel
release available in the brew repository.
Containers (Docker)
Chapel provides a number of Docker images that can be used to run Chapel in a containerized environment. This is a good option if you want to try Chapel without installing it on your host system or if you want to ensure that you have a consistent environment across different machines.
We currently provide three different Docker images:
chapel - basic Chapel compiler and standard library
chapel-gasnet - Chapel with support for multi-locale (distributed memory) programming using GASNet over ethernet
chapel-gasnet-smp - Chapel with support for multi-locale programming using shared memory
For example, the following is a minimal Dockerfile that uses the chapel image to run a simple Chapel program:
FROM chapel/chapel:latest
COPY hello.chpl /app/hello.chpl
WORKDIR /app
RUN chpl hello.chpl
CMD ["./hello"]
Github Codespaces
Github Codespaces are a great way to quickly setup a developer environment for Chapel without needing to install anything on your local machine. The chapel-hello-world repository provides a simple example of how to set up a Codespace for Chapel development. This repository also provides a template that you can use to create your own Codespace for Chapel development.
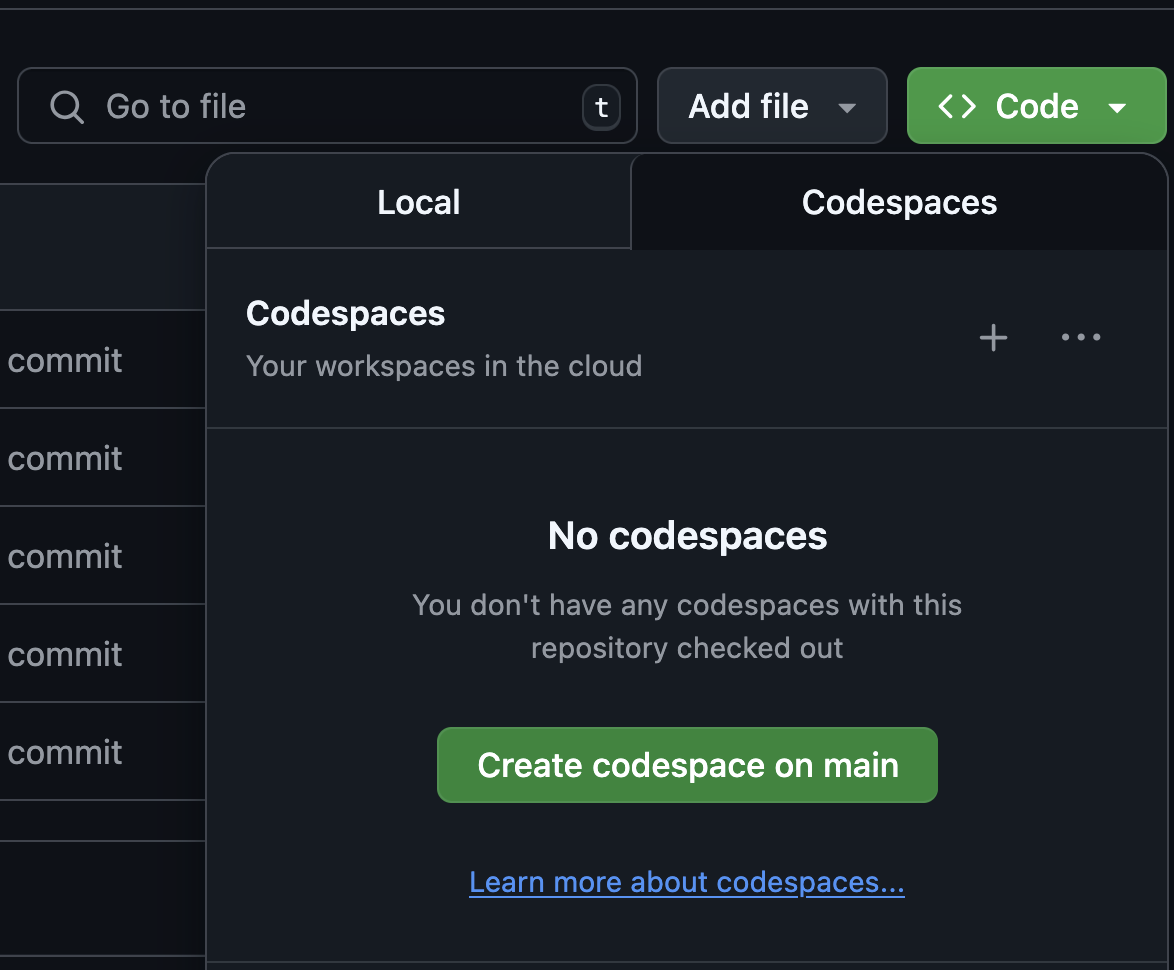
To start using Chapel with a Codespace, use the following steps:
Go to the chapel-hello-world repository.
Click on “Use this template” to create a new repository based on the template.
In the new repository, click on the “Code” button, select “Codespaces”, and then click on “Create codespace on main”.
Building From Source via Spack
Chapel provides a Spack package that can be used to build Chapel from source. This is a good option if you want to use Chapel on a system where a binary release is not available or if you want to customize the build options. See this page for more information on how to use Spack to install Chapel.
Building From Source
These instructions are only intended to get a minimal, low-performance configuration of Chapel up and running quickly to reduce build times and the potential for third-party portability issues. For a more performant and fully featured version of Chapel from source, refer to Using Chapel in its Preferred Configuration below.
See Chapel Prerequisites for information about system tools and packages you should have available to build and run Chapel.
If you don’t already have the Chapel 2.5 source release, see https://chapel-lang.org/download/
Build Chapel in its ‘Quickstart’ configuration:
Unpack the source release if you haven’t already:
tar xzf chapel-2.5.0.tar.gz
Make sure that you are in the directory that was created when unpacking the source release, for example:
cd chapel-2.5.0
Set up your environment for Chapel’s Quickstart mode. If you are using a shell other than
bashorzsh, see Quickstart with Other Shells below.source util/quickstart/setchplenv.bash
Use GNU make to build Chapel. On some systems, you may have to use
gmakeifmakeis not a GNU version.make
Compile an example program, which uses a
forallloop to print messages:chpl examples/hello3-datapar.chplRun the resulting executable, which will print 100 messages in parallel:
./hello3-datapar
Experiment with Chapel in this Quickstart mode to your heart’s content. If you’d like to use this build of Chapel in a different shell / terminal session, see Using Chapel in a Different Shell or Terminal below. Once you are comfortable with Chapel and interested in using a full-featured version in the preferred configuration, see the next section.
Using Chapel in its Preferred Configuration
To use Chapel in its preferred, full-featured mode, you will need to rebuild Chapel from source in a different configuration:
Open up a new shell to avoid inheriting the previous environment settings.
The Quickstart configuration attempts to detect if you have a compatible system installation of LLVM and clang. If you do not, it will set
CHPL_LLVM=nonefor simplicity and to save time. This causes the Chapel compiler to use its C back-end, which is not the preferred option; LLVM is the default back-end, which needs to be available for full functionality. There are a few options for using LLVM:Ensure that you have a compatible version of LLVM installed on your system and enable it with
export CHPL_LLVM=system. Once you have it working, you can leaveCHPL_LLVMunset and Chapel should detect it if it is in your path. See Chapel Prerequisites for details on the currently supported LLVM versions.Or, use
export CHPL_LLVM=bundledto have Chapel build and use the bundled version of LLVM. Note that building the bundled version of LLVM can take a long time.Use
export CHPL_LLVM=noneto continue using the C back-end rather than LLVM
Please see CHPL_LLVM for more information about
CHPL_LLVMand related configuration.If you are interested in building Chapel to support multiple compute nodes (locales), refer to Multilocale Chapel Execution for other settings to enable that.
Repeat steps 2-5 above, but in step 2, source
util/setchplenv.bashinstead ofutil/quickstart/setchplenv.bash. This will set up your environment to use Chapel in the preferred configuration. Note that building this configuration involves compiling third-party packages, which will increase the overall build time.# Set environment variables to preferred configuration source util/setchplenv.bash # re-build Chapel make # compile a sample program chpl examples/hello3-datapar.chpl # run the sample program ./hello3-datapar
If you run into any portability issues, please see Reporting Chapel Issues.
Using Chapel in a Different Shell or Terminal
Note that in both the Quickstart and preferred modes above, any
environment settings made by setchplenv.bash will not persist
beyond your current shell/terminal session. One easy way to use
Chapel from a different shell or terminal is to re-source the
setchplenv.bash script that you used when building Chapel.
However since this can quickly become annoying, other strategies are
available including a ./configure + make install option. See
Using Chapel in a Different Shell / Terminal / Session for details.
Using Chapel in Multi-Locale Mode
All of the “from source” instructions above describe how to run Chapel programs in a single-locale (shared-memory) mode. To run using multiple locales (multiple compute nodes with distributed memory), please refer to Multilocale Chapel Execution.
Notes on Performance
If you plan to do performance studies of Chapel programs, be sure to
use the full-featured version above, to compile with --fast once
your program is correct, and to refer to
https://chapel-lang.org/perf-tips.html for other tips.
Quickstart with Other Shells
Use the table below to identify the location of an appropriate
Quickstart setchplenv script, based on the shell you use.
If you use: |
then type: |
a bash-compatible shell (bash/zsh) |
|
a csh-compatible shell (csh/tcsh) |
|
the fish shell (fish) |
|
the Bourne shell (sh) |
|
Scripts that set the preferred environment for each shell can be
located by removing quickstart/ from the paths above.
What’s next?
For further information about Chapel, refer to the following resources:
Online documentation: |
|
Platform-specific notes: |
|
Example Chapel programs: |
|
Setting Chapel env vars: |
|
Building the compiler: |
|
Compiling Chapel programs: |
|
Executing Chapel programs: |
|
Debugging Chapel programs: |
|
Reporting bugs: |
|
Performance: |
|
Chapel Editor Support: |
|
Chapel’s file/dir structure: |
|
Changes since last release: |
|